Build & Deploy Series | Part-5 | Build and Deploy of React Application in Kubernetes using Ansible hosted on AWS EC2

Highly Recommend using repo here - Day5 to practice this project instead of code present in snippets, In case of confusion, Please do watch video that is explained in English, the code here in the blog is not changed to keep screenshots intact
Before we begin with this, i would highly recommend you to watch till Day4 in Contents of Blog as everything is interlinked
- Installation of Ansible
- Troubleshoot Ansible Installation if config file is missed
- How to make connection between servers for Ansible using SSH
- How to update default hosts file with groups
- How to check ansible hosts connection using ping
- How to run ansible playbooks, updating ignore_errors and syntax check
Configuration to be used for this project:
Type: t3.micro
In case, you want to use same as Docker image, make project with t3.large . make sure you set remote configurations and ssh key connection if you are using t3.micro
the below project is setup in assumption of having both docker and ansible in single server and with type t3.large
#Note: AWS Free Tier is only for 750 Hours per year, so make sure you stop instance once you are done with the project
Before We start this Ansible, i recommend you to watch all the other series, as we are making changes to single react project from the start
We will use the same project here
Ansible is widely popular configuration management tool and can be installed in one server and you can run tasks in other servers if Ansible Master(server in which ansible is installed ) and other servers have SSH connection
Ansible files must be saved with .yaml or .yml extension
Before, We proceed on Ansible, let us move Bash scripts that we have written in Part-4 to Github repository

We will install Ansible in our Build Server and then we will make an SSH connection to our Deployserver from BuildServer
We will ask Ansible to run build.sh script in Buildserver and then deploy.sh in Deployserver
We will write a ansible playbook to achieve this, playbook is a set of tasks to be performed
let us now start with project by installing Ansible
login to Buildserver and install ansible by running these commands
sudo apt update
sudo apt install software-properties-common
sudo add-apt-repository --yes --update ppa:ansible/ansible
sudo apt install ansible 
ansible --version
###if config file shows none#######################################
sudo mkdir -p /etc/ansible
sudo touch /etc/ansible/ansible.cfg
sudo touch /etc/ansible/hosts
sudo vi /etc/ansible/ansible.cfg[defaults]
inventory = /etc/ansible/hosts
remote_user = ubuntu
private_key_file = /path/to/your/private/key
ssh-keygen
if you have used the default
so now our ansible.cfg file is updated in this way
[defaults]
inventory = /etc/ansible/hosts
remote_user = ubuntu
private_key_file = /home/ubuntu/.ssh/id_ed25519
ansible --version


it cab be id_rsa and id_rsa.pub keys in your case, copy the contents of id_rsa.pub if so
sudo vi /home/ubuntu/.ssh/authorized_keys
sudo vi /etc/ansible/hosts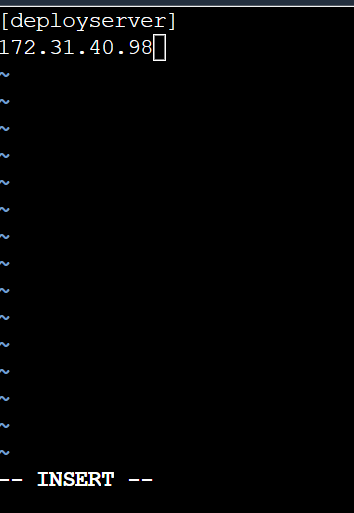
here in above screenshot [deployserver] means group, anything inside [] is considered group
ansible all -m ping
Build of React Application
git clone https://github.com/sagarkakkalasworld/Day5---
- name: Playbook to build our docker image
hosts: localhost
tasks:
- name: remove existing bashscripts directory and ignore task if bashscripts folder is not there
ansible.builtin.shell:
cmd: sudo rm -r bashscripts
ignore_errors: yes
- name: create new bashscripts directory
ansible.builtin.shell:
cmd: sudo mkdir bashscripts
- name: clone bash scripts repo into server
ansible.builtin.shell:
cmd: sudo git clone https://github.com/Hari0o/react-nginx_bashscripts.git
chdir: bashscripts/
- name: giving ownership to build.sh and giving excecuting permissions to build.sh
ansible.builtin.shell:
cmd: sudo chown ubuntu build.sh && sudo chmod 744 build.sh
chdir: bashscripts/react-nginx_bashscripts
- name: running script to make build
ansible.builtin.shell:
cmd: ./build.sh
chdir: bashscripts/react-nginx_bashscripts/ansible-playbook build.yaml --syntax-check
ansible-playbook build.yaml

Deploy of React Application
---
- name: Playbook to deploy our application in kubernetes
  hosts: deployserver
  tasks:
   - name: remove existing bashscripts directory and ignore task if bashscripts folder is not there
     ansible.builtin.shell:
       cmd: sudo rm -r bashscripts
     ignore_errors: yes

   - name: create new bashscripts directory
     ansible.builtin.shell:
       cmd: sudo mkdir bashscripts

   - name: clone bash scripts repo into server
     ansible.builtin.shell:
       cmd: sudo git clone https://github.com/Hari0o/react-nginx_bashscripts.git
       chdir: bashscripts/

   - name: giving ownership to build.sh and giving excecuting permissions to deploy.sh
     ansible.builtin.shell:
       cmd: sudo chown ubuntu deploy.sh && sudo chmod 744 deploy.sh
       chdir: bashscripts/react-nginx_bashscripts

   - name: running script to make build
     ansible.builtin.shell:
       cmd: ./deploy.sh
chdir: bashscripts/react-nginx_bashscripts/ansible-playbook deploy.yaml --syntax-check
ansible-playbook deploy.yaml
kubectl get pods -n react-nginx

ansible-playbook -i testhosts deploy.yamlhere in the above example testhosts refer to inventory
#################################################################
Domain visibility

post that copy AWS EC2 public IP,


Comments
Post a Comment