DevOps and Developer | Java Spring Boot Application Deployment on AWS EC2, Docker , Kubernetes | Sagar Kakkala's World

#Note: It is recommended to watch blog and video on laptop for better visibility
#Note: All the coloured texts are links that can help you navigate to particular topic
About Project
This Project is a Java Spring Boot Project with local database used, this database is connected directly with the application,
Project is more like a login form where the entries of "Name" and "Email" are required,
since project does not have UI, we will send our inputs through POSTMAN, and get our required results Outputs in the application
You can access POSTMAN through web console
As a DevOps,We will deploy this Project in AWS EC2, Docker and Kubernetes
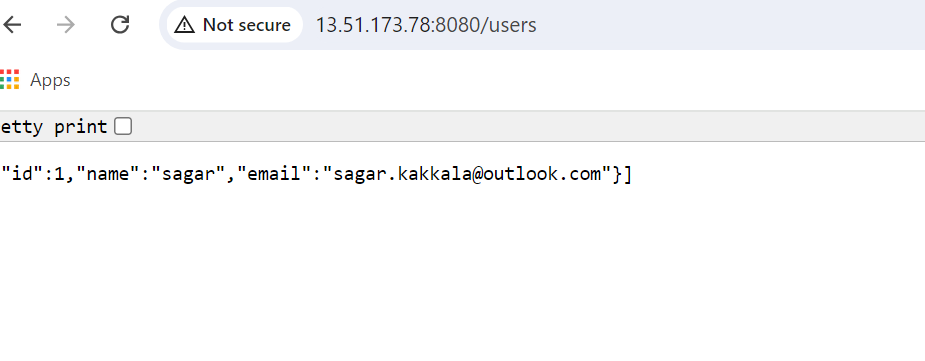
For example, once application is deployed, you can access it with AWS EC2 IP and Port that you have opened application for.
Our Application is called at http://{AWS_PUBLIC_IP}:{PORT_OPNED}/users
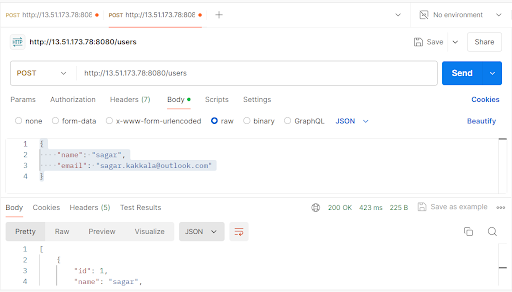
Using POSTMAN, let us give the inputs, select POST, Give the URL ,Body, raw and we will give the inputs in json format

In case, if you give POST again, it will update as new input like Id2, if you want to modify existing data instead of POST, use PUT method
Also, instead of Monitoring from Application, you can use GET Method in POSTMAN to see what data is there at present in URL

once, we give inputs, our Outputs on application would be something like this

You can also access database using h2-console
http://{AWS_PUBLIC_IP}:{PORT_OPNED}/h2-console

you need to give inputs that are mentioned in the code and you can find them at this path
https://github.com/Hari0o/Crud-Demo-Project/blob/main/src/main/resources/application.properties

As of now, the inputs are as follows
JDBC URL: jdbc:h2:mem:testdb
Username: user
Password: password
The entries that we give through POSTMAN,gets updated at this database

You can say hello to our Developer at Charmila LinkedIn
Description from Our Developer for Project goes as follows:
When developing a CRUD operations API in Spring Boot using an H2 database, the process begins with using Spring Initializr to generate a Maven project. This provides a foundational structure, including dependencies for Spring Web, Spring Data JPA, and H2 Database. The CRUD operations (Create, Read, Update, Delete) are implemented using Spring Data JPA repositories, which handle data access and manipulation with minimal boilerplate code. The H2 database, an in-memory database, is ideal for development and testing due to its simplicity and easy integration with Spring Boot. Controllers expose RESTful endpoints, enabling interaction with the entities. By leveraging the Spring Boot framework, developers can focus on business logic rather than boilerplate, leading to a cleaner and more maintainable codebase. Additionally, the use of the H2 console provides a user-friendly interface to interact with the database during development.
Understanding React and Java Project

Since as we had seen in React Project, Process goes like Install NodeJs and npm, run command "npm run build" based on "package.json" file, it creates "Build" folder and it has "index.html" file which we deploy
In the same way, for Java Project , Process goes like Install Java and Maven, run command "mvn clean install"based on "pom.xml" file, it creates "target" folder and it has ".jar" file which we deploy
DevOps Part of Deployment
Deployment in AWS EC2:

Build of Java Project
git clone https://github.com/Hari0o/Crud-Demo-Project.git

Now since it is a Java Project, let us install java and maven, you can run the below bash script which even configures environment variables that are required
sudo vi java_and_maven.sh
#!/bin/bash


# Update package repository
echo "Updating package repository..."
sudo apt-get update -y


# Install OpenJDK 17
echo "Installing OpenJDK 17..."
sudo apt-get install openjdk-17-jdk -y


# Verify Java installation
echo "Verifying Java installation..."
java -version


# Set JAVA_HOME environment variable
JAVA_HOME=$(update-alternatives --config java | grep 'java-17-openjdk' | awk '{print $3}' | sed 's:/bin/java::')
echo "Setting JAVA_HOME to $JAVA_HOME..."


# Add JAVA_HOME to ~/.bashrc for persistence
echo "export JAVA_HOME=$JAVA_HOME" >> ~/.bashrc
echo "export PATH=\$JAVA_HOME/bin:\$PATH" >> ~/.bashrc


# Apply changes to current session
export JAVA_HOME=$JAVA_HOME
export PATH=$JAVA_HOME/bin:$PATH


# Verify JAVA_HOME
echo "Verifying JAVA_HOME..."
echo $JAVA_HOME


# Install Maven manually
echo "Downloading and installing Maven..."
wget https://downloads.apache.org/maven/maven-3/3.9.4/binaries/apache-maven-3.9.4-bin.tar.gz


# Extract Maven
tar -xvzf apache-maven-3.9.4-bin.tar.gz


# Move Maven to /opt directory
sudo mv apache-maven-3.9.4 /opt/maven


# Set M2_HOME and update PATH for Maven
echo "Setting up Maven environment variables..."
echo "export M2_HOME=/opt/maven" >> ~/.bashrc
echo "export PATH=\$M2_HOME/bin:\$PATH" >> ~/.bashrc


# Apply Maven changes to current sessionexport M2_HOME=/opt/maven
export PATH=$M2_HOME/bin:$PATH


# Verify Maven installation
echo "Verifying Maven installation..."
mvn -version


echo "Installation of OpenJDK 17 and Maven completed successfully!"
sudo chmod +x java_and_maven.sh
sudo ./java_and_maven.sh
mvn --version

In case, you see maven is not installed, i suggest run the command
sudo apt install maven
cd Crud-Demo-Project/

mvn clean install


cd target

Deployment of Java Project
Deployment in AWS EC2,
java -jar crudDemo-0.0.1-SNAPSHOT.jar


Now access POSTMAN through web console, and you need to give the same URL that you accessed
This shows we successfully deployed it in AWS EC2
Deployment in Docker
sudo docker build -t crud-demo .
sudo docker images
sudo docker run --name crud-docker-container -p 8080:8080 -d crud-demo
Deployment in Kubernetes
alias kubectl="microk8s kubectl"
kubectl create ns crud-demo
vi deployment.yaml
apiVersion: apps/v1
kind: Deployment
metadata:
  name: crud-deployment
  namespace: crud-demo
  labels:
    app: crud-demo
spec:
  replicas: 1
  selector:
    matchLabels:
      app: crud-demo
  template:
    metadata:
      labels:
        app: crud-demo
    spec:
      containers:
      - name: crud-demo
        image: sagarkakkala385/crud-demo ##change image name to that of your docker hub
        ports:
        - containerPort: 8080
kubectl apply -f deployment.yaml
vi service.yaml
apiVersion: v1
kind: Service
metadata:  name: crud-service
  namespace: crud-demo
spec:
  type: NodePort
  selector:
    app: crud-demo
  ports:
    - protocol: TCP
      port: 80
      targetPort: 8080
      nodePort: 30000
Comments
Post a Comment