
Highly Recommend using repo here -GitOps-Kubernetes and GitOps-HelmCharts to practise this project instead of code snippets, In case of confusion, Please do watch video that is explained in English, the code here in the blog is not changed to keep screenshots intact
Use the following Repos for the Project
git clone https://github.com/sagarkakkalasworld/Day17
git clone https://github.com/sagarkakkalasworld/GitOps-Kubernetes
git clone https://github.com/sagarkakkalasworld/GitOps-HelmCharts
What is GitOps and Why it is used?
GitOps as the same suggests it is Git and Operations , and GitOps can only be used as CD (Continuous Deployment) tool, cause here we cannot use tools involved in GitOps for CI process like to Build Artifacts, yet lets understand why GitOps is used.
Real World use case of GitOps
Lets take a real world use-case, You are running E-commerce website and as you know during Black Friday, people that access websites would be more, so we need to increase replicas, You can just change it in Git repository that linked with ArgoCD, and ArgoCD takes care of your increase in replicas with in seconds.
This addressed an issue, where if we increase our replicas to 4 from 3 in Deployment file, we need to run complete pipeline and CI process like building artifacts and code packaging, all the steps which are not necessary used to be involved.
And one more, it can help it with is, easy of UI for rollbacks and checking our application by ArgoCD dashboard and also notifies health status.
To keep steps simple, like for CD, we use many tools like FluxCD, ArgoCD and there are many other tools which i may miss but among all ArgoCD is the most popular one.
Comparing ArgoCD Sync with Google Account Sync Across Devices
Let us understand How ArgoCD works with simple example, consider you bought a new mobile at 2023, You save contacts and sync with Google cloud, and you passed your mobile to younger sibling cause you bought new mobile without signing out from Google account. Now if you buy a new mobile at 2024, and sign in with Google account, Your contacts that are saved from previous mobile would appear here.
Now lets say , your younger sibling saved a contact named "ravindra" with your google account still, and this contact named "ravindra" will appear on your mobile too considering sync times.
You can assume the mobile that your younger sibling is using as Github Repo and mobile you are using as Deployment Server, just like how Google account was able to detect changes and make contacts sync across both the mobiles, same way ArgoCD works on principle of sync between your Github Repo and Server.
If we are using ArgoCD, we need to use repositories that must have Kubernetes Manifest Files or Helm Charts
Lets understand ArgoCD better by using this project
Installing ArgoCD
Before starting with ArgoCD, it is better,if you have Docker, Kubernetes and Helm Charts Installed
You can directly refer to Official Documentation or use the commands below to install ArgoCD
kubectl create namespace argocd
kubectl apply -n argocd -f https://raw.githubusercontent.com/argoproj/argo-cd/stable/manifests/install.yaml

You might run into issue,if you are running microk8s, in such case, use the following command and re-run the above command again, ignore the below command if your argocd installation is the same way as above screenshot
microk8s.config > ~/.kube/config
Now lets access ArgoCD server by changing our argocd server access from ClusterIp to Nodeport
You can change by editing service file or by using following command
kubectl expose service argocd-server --type=NodePort --name=argocd-server --port=80 --target-port=8080 --protocol=TCP -n argocd --dry-run=client -o yaml | kubectl apply -f -

once you have run the command, check services to get NodePort value


and once you are on your profile, click on your picture


Click on Generate New Token Classic

Enter your password

Make sure to select write packages


click on Generate Token

Make sure to save the token somewhere as it is only visible one time


Once you run the command, you can observer that our secret is encrypted, we can now append this encrypted data with file name reactsealedsecret.yaml


Now while copy pasting, even we miss to copy one key, it makes our job tougher, easy way is to clone our Git repo, add the file push back to repo


and above secret can only be decrypted by server that has kubeseal installed and encrypted it

fill in the details


As you can see from above screenshot, it shows "Outofsync" but this is because our Server does not have application in running but Github repo that we integrated has application


As you can see, one pod is up just 80 seconds ago


Now, we will repeat the same steps just like we did it in kubernetes UI but only thing we need to be aware of


and scrolling down you will be able to find this file as ArgoCD is able to detect Helm Chart files

and click on Create

click on Sync

and then synchronize

We have successfully Deployed even our Helm Repo
kubectl get svc -n argocd

As you can see from above image, our argocd runs on NodePort 31804, and our AWS EC2 Public IP is 13.57.184.37
Now open browser and hit http://AWS_EC2_Public_IP:NodePort, In our case it is http://13.57.184.37:31804

And Username, would be admin and Password would be stored in secret named initial-admin-password inside argocd namespace and to get password, run the following command inside server
kubectl get secrets argocd-initial-admin-secret -n argocd -o json | jq -r .data.password | base64 -d
Be careful while copying the password , only enter details before Ubuntu as per above screenshot
Now use this password to login to server

once you login , this is how you find ArgoCD Dashboard as per above screenshot
We can turn up applications using ArgoCD UI or even ArgoCD CLI
let us first use CLI first and then verify in UI Dashboard
Installing Application using CLI
And to use CLI, we need to install argocd cli, you use use official documentation or command below
VERSION=$(curl -L -s https://raw.githubusercontent.com/argoproj/argo-cd/stable/VERSION)
curl -sSL -o argocd-linux-amd64 https://github.com/argoproj/argo-cd/releases/download/v$VERSION/argocd-linux-amd64
sudo install -m 555 argocd-linux-amd64 /usr/local/bin/argocd
rm argocd-linux-amd64

We have installed ArgoCD CLI successfully
Now to login to server , we need to use our argocd server, a moments back we logged into browser using http://13.57.184.37:31804, here using cli we have update command as shown below in command tab, same username and password will be used as we used in browser
argocd login 13.57.184.37:31804 --insecure

and above insecure tag is because our application runs on http, you can choose to run without insecure tag
You can choose to update password or use initial admin password by argocd according to your choice, but is recommended to update password using command
argocd account update-password
Once done, it is advisable to delete secret of initial admin password
kubectl delete secret argocd-initial-admin-secret -n argocd

Now let us get into installation application using CLI
This is the Repo provided by ArgoCD to test its deployment - ArgoCD Repo
Let us use the same repo for creating application using CLI
argocd app create guestbook --repo https://github.com/argoproj/argocd-example-apps.git --path guestbook --dest-server https://kubernetes.default.svc --dest-namespace defaultOnce created let us verify by UI, login to browser argocd and refresh browser

As you could see from above screenshot, we are able to see the application Guestbook
Now let us see, inside application

As you can see from above screenshot, we are able to easily easy what application consists of and its different components, even if something is unhealthy, we can easily find which component is failing by checking on this ArgoCD UI Dashboard
Generate Github Token Before using Kubernetes Manifest files and Helm Chart files
If you are having your own Github Repo, Generate Token in your account and fork the repositories of Kubernetes and Helm Charts that we will be using
once you are in your repo, click on Your Profile
and once you are on your profile, click on your picture
Now scroll down to developer settings
click on Personal Access tokens and Tokens classic
Click on Generate New Token Classic
Enter your password
Make sure to select write packages
click on Generate Token
Make sure to save the token somewhere as it is only visible one time
Installing Application using UI for Kubernetes Manifest files
For this, let us use our own repo, You can clone repo - Kubernetes and this session is made with respect to SSL Certificate used as a secret
You can check SSL session for Reference here - SSL Session
Now before we use our Kubernetes Manifest files, we need to use secrets in our Github Repo for our application to read
But we cannot keep secrets in Github repo as these are accessible and secrets are base 64 encoded, so they can be easily decoded
In order to use secrets inside our Kubernetes Repo,we need to use some Encryption, there are number of ways to manage our secrets , ArgoCD secret Management Official Documentation
Now since we are using SSL as secret and here, we have files inside server of certificate and private key, i am generating secret by simple command
kubectl create ns react-demo
kubectl create secret tls hari-dev-ssl --cert=www_hari-dev_shop.crt --key=haridev.key -n react-demo --dry-run=client -o yaml > reactsecret.yaml
Now we need to encrypt the reactsecret.yaml file so that we can place it in our Github repo without fear of sensitive data being exposed, Let us use Sealed Secrets for it
Installing KubeSeal CLI for Secret Encryption
We will be using Bitnami sealed secrets here on this demo
In short about Bitnami Sealed Secrets, We will use kubeseal as our CLI tool here, Kubeseal has capacity to encrypt our secret and we can keep our Encrypted secret publicly in any repo, and only Kubeseal can decrypt it, While Kubernetes inside our server gets this file, Kubernetes will not be aware of encryption and decryption, it will get the file in regular base64 format, once we use sealedsecrets via kubeseal CLI,it is difficult even for us to decrypt
Now let us see this in practical
Install sealed-secrets helm charts
helm repo add sealed-secrets https://bitnami-labs.github.io/sealed-secrets
helm install sealed-secrets sealed-secrets/sealed-secrets -n kube-system
once done, we need to install kubeseal CLI
KUBESEAL_VERSION='0.23.0' # Set this to, for example, KUBESEAL_VERSION='0.23.0'
curl -OL "https://github.com/bitnami-labs/sealed-secrets/releases/download/v${KUBESEAL_VERSION:?}/kubeseal-${KUBESEAL_VERSION:?}-linux-amd64.tar.gz"
tar -xvzf kubeseal-${KUBESEAL_VERSION:?}-linux-amd64.tar.gz kubeseal
sudo install -m 755 kubeseal /usr/local/bin/kubeseal
Now kubeseal needs some medium to encrypt any key, so we will be using certificate key to use
Kubeseal comes with secret in same namespace that we have installed kubeseal, we have installed kubeseal in kube-system namespace as we want our kubeseal to be secured and do not be deleted by accident, since kube-system is safest namespace which would not be touched most of times in practical cases except on troubleshooting, we used this namespace
kubectl get secrets -n kube-systemNow we need a certificate inside this secret for our kubeseal CLI to work, so let us save the certificate inside using command
kubectl get secrets sealed-secrets-keyk58xr -n kube-system -o json | jq .data'."tls.crt"' -r | base64 -d > sealedsecret.crtchange the above command according to sealed secret key in your server
Now let us try to encrypt our secret reactsecret.yaml for SSL certificate that we generated earlier using kubeseal
kubeseal --cert sealedsecret.crt --scope cluster-wide < reactsecret.yamlwe are using scope as cluster wide as our application is in different namespace and we want kubeseal to decrypt when our secret is even in different namespace
Once you run the command, you can observer that our secret is encrypted, we can now append this encrypted data with file name reactsealedsecret.yaml
kubeseal --cert sealedsecret.crt --scope cluster-wide < reactsecret.yaml > reactsealedsecret.yamlYou can remove our sealed reactsecret.yaml and copy paste contents of reactsealedsecret.yaml into our public repository
Now while copy pasting, even we miss to copy one key, it makes our job tougher, easy way is to clone our Git repo, add the file push back to repo
Remeber Git Token we generated that comes handy here
git clone https://"Your_Token"@github.com/Hari0o/kubernetes.git
also command to be updated by your repo
once the command is copied, it let us copy our encrypted secret and push
cp reactsealedsecret.yaml kubernetes/
cd kubernetes/
git add .
git commit -m "added sealed secret"
and then git push using your token
git push https://"Your_token"@github.com/Hari0o/kubernetes.gitNow if we check our repo, we can see sealedsecret file
and above secret can only be decrypted by server that has kubeseal installed and encrypted it
Now lets use ArgoCD with UI for Kubernetes Manifest files
login to ArgoCD from your Browser
click on New App
fill in the details
Give any Application name, you want to , We can configure Different Projects in ArgoCD, but let us use default as of now
and Sync Policy has Manual and Automatic, if you are using in Prod, Manual is recommended
how sync policy works, for suppose ,we changed Kubernetes replicas from 3 to 4 in deployment file, ArgoCD detects that Github Repo and Server Repo are not in sync, if we selected manual , we need to click on synchronise which we will see in shorter while, if it is Automactic ArgoCD does the things for us
You can select Auto-Create Namespace which creates namespace for us
This is where we need our Repository URL to be updated for ArgoCD to get us in sync, and PATH, if you have many applications inside one repo, you can specify path like application/ , since inside repo which i am using, all the files are under root, so i have to use "."
to make it more clear, if you are using ArgoCD repo , you need to use path as guestbook/
and cluster URL, you can use it by default and namespace as react-demo
and if you want to run our app using manifest file , you can click on Edit as YAML
You can run this as manifest file as well inside server
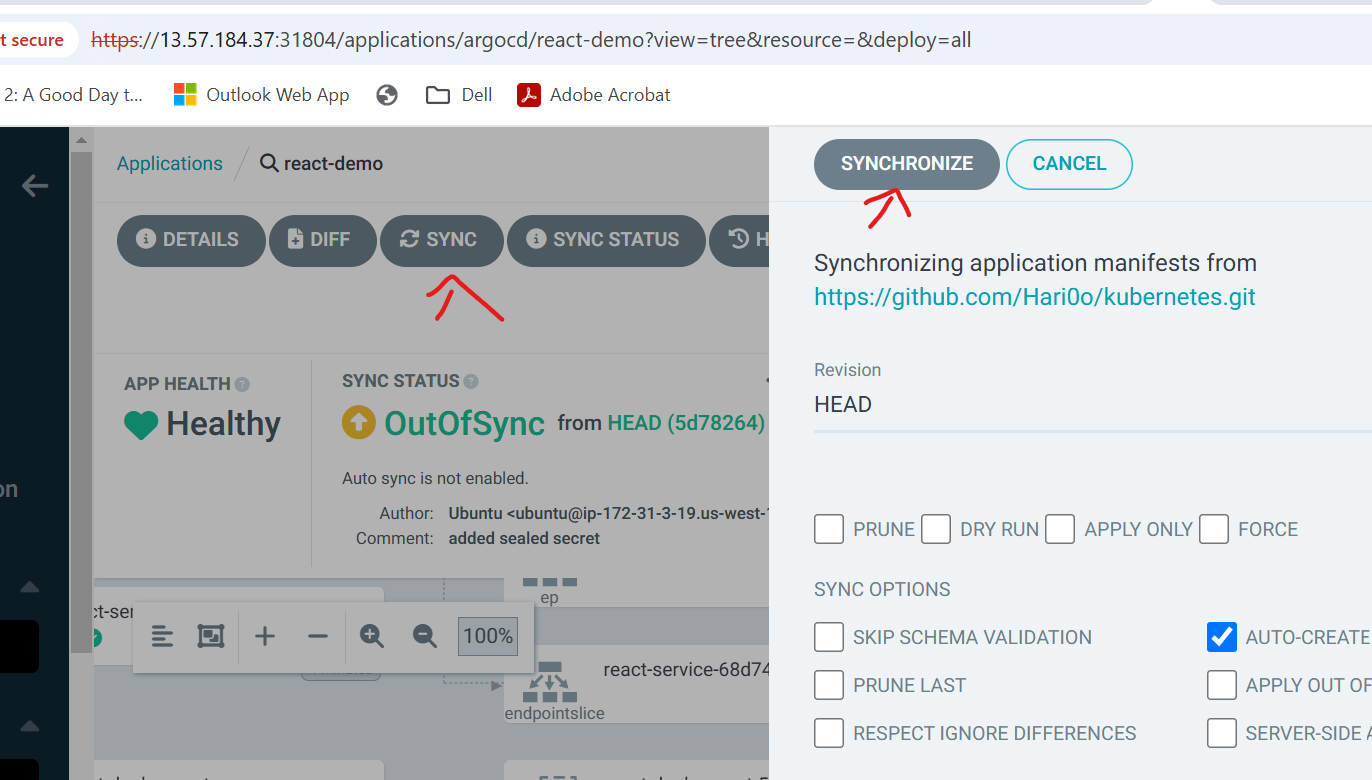
Now lets create application using UI, click create
As you can see from above screenshot, it shows "Outofsync" but this is because our Server does not have application in running but Github repo that we integrated has application
We just need to click on sync and synchronise
and once synchronized, you can see application this way from UI
let us make a change in our Github repo from 1 replica to 2 replicas
Now, if you want to see ArgoCD, click on Refresh
You can observer as soon as we clicked on refresh, it went out of sync
Now let us sync again
After sync, you can see there are two replicas of pods
You can also verify it in server
As you can see, one pod is up just 80 seconds ago
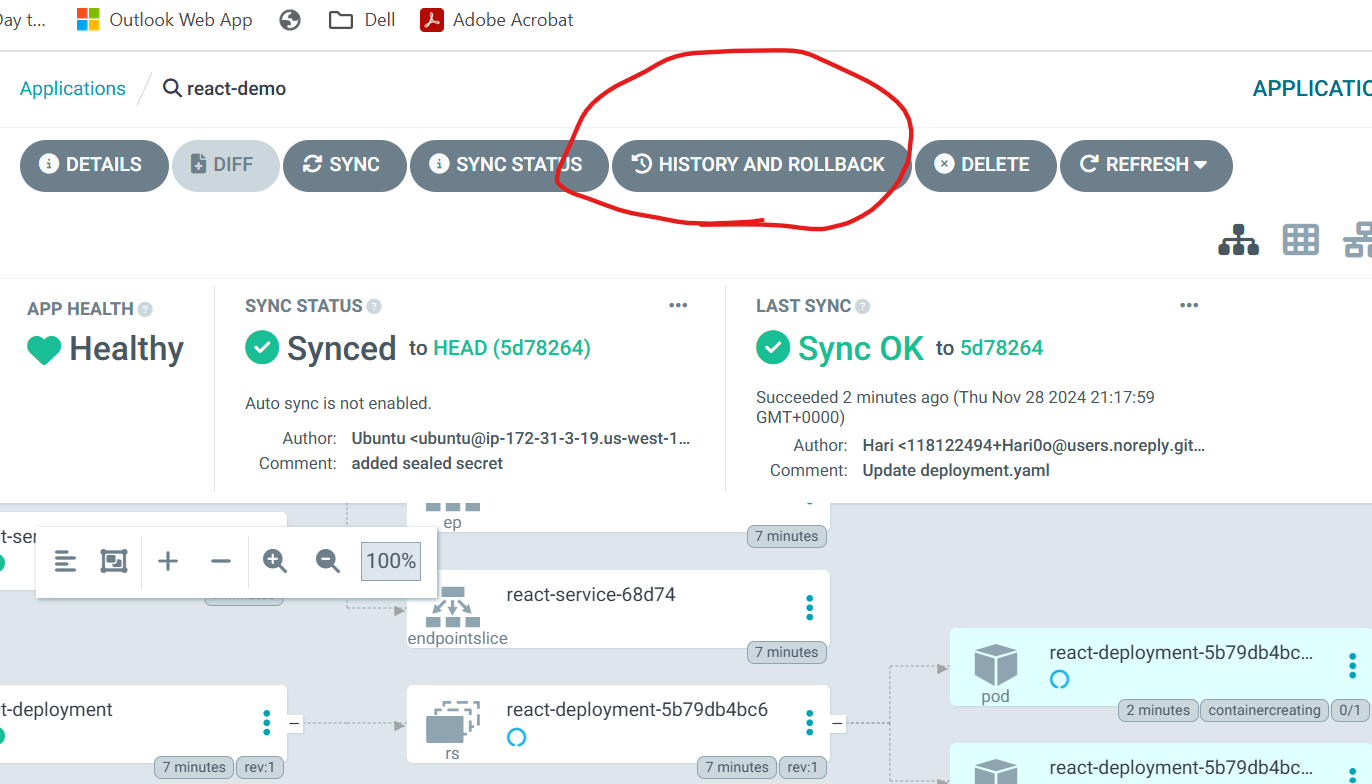
Now also ArgoCD gives us an ease of Rollback, let us use rollback by ArgoCD
click on History and RollBack
select the rollback you wanted to do and click on Redploy
click Ok
As you can see, it deleted one Pod and went into OutofSync, cause our Github Repo still has 2 replicas
Deploy Helm Values using ArgoCD UI
Here, ArgoCD allows only two repositories, Helm Charts and Kubernetes Manifest Files
Note: since our Helm Charts are in Git Repository, select Git as URL repo store
We have our helm charts here - Helm Repo
since Helm charts used by this repo, needs a secret, let us create secret directly inside our server
kubectl create ns react-nginx
kubectl create secret tls hari-dev-ssl --cert=www_hari-dev_shop.crt --key=haridev.key -n react-nginx
since helm chart is created at initial using command helm create react-chart - Blog to refer
We need to use Application name as react-chart
and then repository, though it is helm chart , do not change here to helm as our repo is in Git though it is helm file and PATH as "." , as we have all main files inside root directory
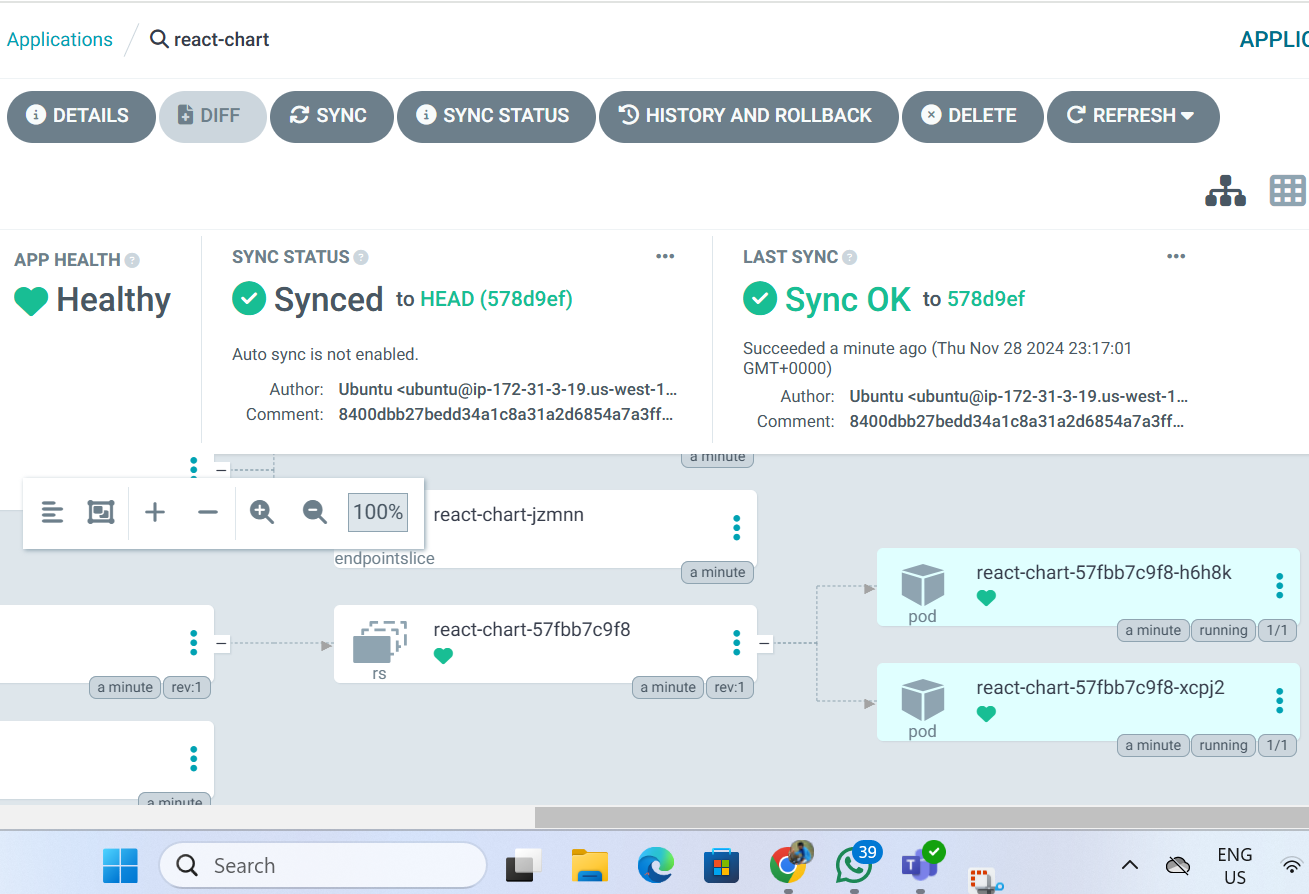
and scrolling down you will be able to find this file as ArgoCD is able to detect Helm Chart files
and click on Create
click on Sync
and then synchronize
We have successfully Deployed even our Helm Repo
Implementation of CD as ArgoCD in our Ongoing Project
As you know about project that we are doing on Gold site Ecommerce, that is being integrated with Jenkins for CI/CD process
Previous Process Jenkins use to take care of CD as well by replacing Generated image tag and placing it on helm charts - have a look at deploy.sh script
Now While integrate CD, we used deploy.sh script modified this way - new deploy.sh
New deploy script follows same process just like Jenkins, but there are slight difference
After updating tag value in Helm values, Jenkins used to run Helm upgrade previously threby deploying our application
In the new setup, Jenkins pulls the Helm Repository from Helm Repo , updates the values.yaml file with new tag and pushes back to github repository, Now updated Github repository that is in sync with ArgoCD, as soon as ArgoCD detects that code code in server and Repo are not in Sync, it updates to OutOfSync and waits for us to manually click on Sync
Final Repos used for Project
Code Repo - Gold site e-commerce
Ansible Repo - Ansible Goldsite
Bash Scripts - BashScripts Goldsite
Helm Charts - HelmCharts Goldsite
This concludes our blog.
🔹 Important NoteAlso, before proceeding to the next session, please do the homework to understand the session better - DevOps Homework
I Post most of my content in Telugu related to contrafactums(changing lyrics to original songs),fun vlogs, Travel stories and much more to explore, You can use this link as single point of link to access - Sagar Kakkala One Stop
🖊feedback, queries and suggestions about blog are welcome in the comments.
Comments
Post a Comment